Essential Guide #2: Principles of Fleet Command
How to organise your space forces effectively: From a Captain commanding a single Star Destroyer and support craft, to a Grand Admiral controlling multiple fleet groups.
“Enemy Ships Incoming!”
Picture the scene: enemy ships are dropping out of hyperspace. You have at most one minute to organise your defensive forces into Control Groups and give initial orders. You might be outnumbered, you might be relying on reserve ships. You might not know the composition of the enemy fleet.
How should you organise your fleet for maximum efficiency? How should you assign units to Control Groups? What principles of fleet organisation and command apply as a battle progresses? How do these ideas change between managing small forces and managing large ones?
This guide is about the mod Age of Legends, but these principles apply to Empire at War more generally. I hope this will contain useful insights for players of all abilities, from complete beginners to experienced fleet commanders.
I’ve organised this by the population cap (in brackets) of your own forces, and then assigned a rank to those forces based on the type of officer that would typically be commanding such a group - from small forces to large armadas:
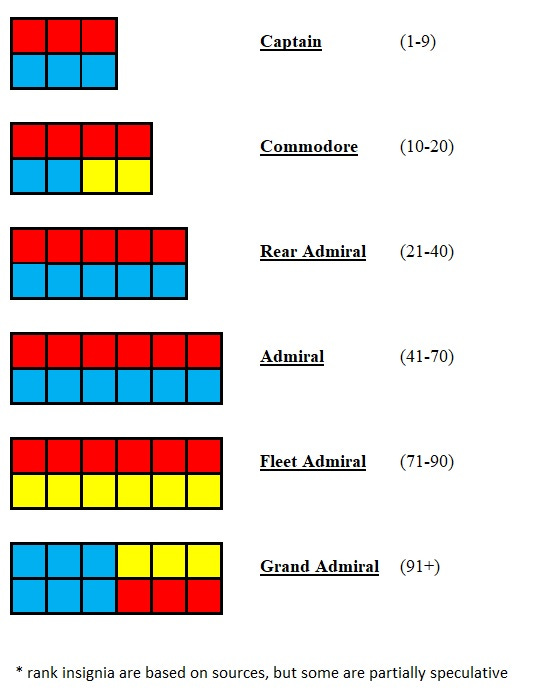
Captain (1-9) – control groups, role-and-type organisation
A situation where you have up to 9 population points worth of units. This might be the defensive garrison of a Level III Capital shipyard, or a defensive force of perhaps one Star Destroyer and a pair of IPV gunships or similar. At most you might have two Star Destroyers or Star Cruisers. The capital ship(s) and any space stations will add additional squadrons. The exact composition will of course vary.
At this level of tactical engagement you can realistically command or micromanage every single asset on the map. Every player will have their own preference, but I organise units into Control Groups (CG) based on their role, which is also a measure of who will make contact with the enemy first: CG-1 interceptors and fighters, CG-2 bombers, CG-3 screening forces like gunships and corvettes, possibly with slow or reserve fighters held back, and CG-4 capital (and anti-capital) ships. CG-4 would include both major capital ships like an Imperial II-class, but also ‘fire support’ ships like the Carrack or Dreadnaughts that supplement the ISD-II in its central role.
These Control Groups are role and type-based.
Commodore (10-20) – unit cohesion
At up to 20 population points this group can be significantly larger than the Captain-level force. This could be like the fleet of Admiral Daala: four Star Destroyers with their entire complement of TIEs, or else 2 or 3 capital ships backed-up by significant support ships: corvettes, fleet tenders, minelayers, and fire support cruisers. A group like this commanded by a Commodore can defeat a much larger force, if managed well. The scale of forces here is still such that they essentially can be micromanaged through role and type-based Control Groups, though perhaps with less scope for attention to the individual abilities of each ship.
A Commodore’s force should be organised using the same principles as a Captain’s force. The same control groups should be used, and the emphasis should be on maintaining unit cohesion: the individual elements of this fleet can easily be destroyed if isolated. But 2-4 Star Destroyers pouring out fire in a concentrated way, with cruisers and bombers assisting them, can be highly effective offensively and defensively. You will not usually be able to afford having a strategic reserve with a force this size, and, depending on the tactical situation, you may be forced to press non-frontline ships into combat as well.
Rear Admiral (21-40) – introducing fleet elements
Potentially the first major force size, depending on its composition. This could be ten Imperial-class Star Destroyers, or it could exchange some of those capital ship slots for support crafts, frigates, light carriers, cruisers or smaller Star Destroyer types. Or it could be a flotilla composed entirely of mid-sized ships. A smaller Rear-Admiral’s fleet could be organised on the principles discussed above, with groups organised by role and type. But a larger fleet should be organised on a different basis, according to fleet elements.
In large-scale fleet engagements it is not possible to micromanage the action of every single squadron or corvette all of the time. You cannot micromanage everything. You have to place ships effectively and look at the larger picture as the battle develops: focusing on the effectiveness, fire output and survivability of whole groups of ships, or fleet elements.
In battles of this type, instead of CG-1 being fighters, CG-2 being bombers, CG-3 being screening ships and so on, with you micromanaging each unit, your first Control Group might consist of a force of heavy, damage-soaking ships and their escorts, with fighters, sent forward to slow-down an enemy advance while you re-organised a second-line of defence, with CG-2 being their relief force pushed forward to cover their retreat, and CG-3 being the main defensive line. Each of these CGs would not be organised on the basis of their constituent unit types, but by the role of the fleet element as a whole.
In engagements of this size, each Control Group will consist of multiple different unit types: rather than groups being pure-fighter or pure-corvette, CG-1 for instance can consist of Star Destroyers, cruisers, frigates, support ships, and squadrons. But the fleet element has a role as a coherent tactical unit: just as a group of pure bombers has a clear role in small forces, so too should a fleet element have a clear role in mid-sized and larger forces. That role might be to hold a fixed position, or to engage an enemy flank etc., and the fleet element should work as one whole to do so.
Admiral (41-70) – mastering the strategic and tactical
Here we are dealing with fleets ranging from the medium to the large. A maxed-out Admiral’s fleet could include a Star Dreadnought and four or five Star Destroyers. Or up to 17 Imperial-class Star Destroyers. Or a lesser number of Star Destroyers and a large group of second-tier support ships. The exact force composition will vary based on your faction, play-style and the overall strategic picture on the galactic map.
An Admiral cannot worry about every single squadron for the entirety of a battle. You must master both the strategic, and the tactical. And that means using task-force based control groups divided into large fleet elements, as above but on a bigger scale. Your strategy might be to split your forces in two and have CG-1 mount a defensive feint while CG-2 sneaks around to out-flank the enemy (as just one example).
Within this scale you can still think tactically. You might commit CG-2 to battle and that might be your sole force in combat at that time. In which case you can use the command principles of controlling a smaller group: in cases where you break off a detachment or flotilla from your main force you could use the Commodore-level tactics of CGs 1 through 4 being role/type-determined, with the entirety of the rest of your fleet being under CG-5 until it is needed.
You might also have specific task forces under specific control groups for special purposes: maybe CG-3 is a group of hidden StealthXs waiting to strike at an enemy commander, or CG-4 are your interdictors with a group of land forces waiting evac, or CG-5 is your strategic reserve.
If a Star Dreadnought is present, it should be its own control group: this allows you to quickly check on its condition during a battle. As a fleet essentially in their own right, they are probably the only single units you can continue to micromanage. This does not mean a Star Dreadnought should isolated spatially from other ships, just that it should be its own control group for command purposes and ease of control.
You cannot lose sight of the larger picture in managing forces of this size, but you also have scope to focus on particular tactical elements at different phases of a battle like this.
Fleet Admiral (71-90) – fleet groups
We now approach the largest battles possible in Empire at War (or Age of Legends). 90 is the maximum space population cap in Age of Legends for units on the map at any one time. Such a force could amount to 22 or more Star Destroyers, or two Super Star Destroyer with support ships.
Do not be fazed by the apparent complexity of such a battle. The principles remain the same. Organise your forces this time according into fleet groups. A fleet group will be equivalent in scale to multiple fleet elements. In addition, assign units to any necessary task-forces, each such can then be a control group. Any Star Dreadnoughts should also be their own control group, as before.
With smaller forces the onus is on maintaining the fighting integrity of your entire fleet, keeping them whole, so that they can reinforce each other, provide overlapping fire, and so that screening ships can use point defence abilities, repair ships can do their work, and minelayers can focus on a defined-area for their duties. All of those principles still apply: but in fleets this large, it is very difficult to maintain the coherence of your entire armada, particularly as they will occupy a large area of space. Hence the onus on fleet groups and maintaining the coherence of those groups.
Even more so than an Admiral must, a Fleet Admiral must think in terms of large forces, the scale such that each could really be a fleet on its own. Your control must be focused at the very upper level, typically with two fleet groups (CG-1 and CG-2), each maintaining their own coherence, with a reserve group (CG-3) which can either relieve a retreating fleet in its entirety – a very difficult manoeuvre to execute – or else feed ships into CG-1 and CG-2 to maintain their overall fighting strength, with CG-3 in turn ‘replenished’ by taking on any ships that need to withdrawn from CG-1 or CG-2 to recharge their shields.
Grand Admiral (91+) – surviving the deluge, avoiding a pell-mell
These are the most massive battles fought: think of the Separatist attack on Coruscant at the end of the Clone Wars, or the Galactic Alliance’s liberation of Yuuzhan’tar at the end of the Vong Invasion. While the 90 pop cap limit remains for units on the map at any one time, the enemy can utilise fleets with pop caps way above that limit, bringing in reinforcements as they drop below the 90 limit, to maintain a very large fighting force at continual full, or near-full strength.
A typical division would be into three fleet groups, CG-1, CG-2, and CG-3 (reserve).
Particularly for a commander fighting a defensive action in such difficult circumstances – and this would typically be over a major shipyard world, the galactic capital, or a highly significant hyperspace lane – the emphasis, even more so than for a Fleet Admiral, must be in maintaining these precious fleet groups. If ships become isolated in engagements this massive they will be picked off and destroyed. But worse – because you cannot afford to think at that small-scale level – entire task forces or even whole fleet groups can suffer the same fate.
In these situations, maintain the coherence of your own forces, ensure that CGs 1-3 can all support each other (just as individual capital ships would support each other in smaller battles), and, most of all, try for as long as possible to avoid the fragmentation of your forces. If you cannot afford to retreat and must win the battle and are left trying to hold on whatever against a larger enemy force, you will suffer heavy attrition. But preserving fleet coherence can ensure you survive - or at least inflict unsustainable losses on the enemy.
Nonetheless, however well you play, a truly massive force can push you to a situation where your fleet groups begin to break-up and the battle degenerates into a pell-mell of individuals engagements and fragmented actions. In which case you have the nightmare scenario of no longer managing an organised armada and its constituent fleet groups, but of attempting to micromanage dozens of separate Commodore or even Captain-level forces. This quickly becomes unmanageable, and isolated elements will fight inefficiently and be destroyed.

The overriding objective in such a scenario should be force consolidation. If your fleet groups are shattered, you should attempt to united survivors into a single force (or at least concentrate them insofar as you can into separate forces if a single force is not achievable), and then begin to apply the same principles explored above for commanding a smaller fleet element or other formation.
Things To Look Forward To
I hope that has been informative, and makes fleet management less daunting. If you follow these command principles, you will find it much easier to achieve the tactical results you want. (More on tactics in later issues!)
The next issue of this weekly newsletter will focus on defeating a superior (or even hegemonic) faction on the Galactic map, using the tactics not only of the Rebel Alliance, but something called ASSERT - a novel strategic doctrine I have developed over the years.
In addition, there will be a NEW short story soon, focusing on the first New Republic ambassador to the Imperial Remnant.
Your Subscription Options
To celebrate the re-launch of the Essential Guide, the initial content will all be completely FREE.
After that, you can become a Full Subscriber to continue receiving these weekly Age of Legends newsletters and to support this project. That will cost just $5 a month, with a discount if you sign-up for the whole year.
All subscribers will also receive a free (at least) monthly short story set in the Star Wars Expanded Universe, based on the period of the Age of Legends mod.